Best Design How to Create a Geometric, WPAP Vector Portrait in CorelDraw
In this tutorial we will learn how to make geometric vector in coreldraw. Geometric vector is one of the art design vector portrait that is no stranger to the designers.
Coreldraw tutorials at this time, we went back to using the photo ball players. Maybe because I am a fan of this sport, so a lot of tutorials given by design now uses photos of ball players. Geometric vector tutorial and for this I am using photo Xavi Jr. with the uniform.
FOR EXCAMPLE


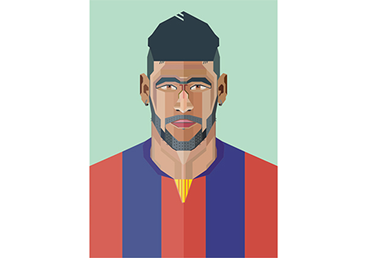
The following is the final result from geometric vector.

SOFTWARE : Corel Draw X7
TIME : 30 Minute
Here is a step by step we have to do.
As the photos will we wear on this occasion. A photo of one of the stars of the Past i.e. Neymar Jr.
Open the photo, and then turn on the tool and transpancy applied on this photo. Use the transparency tool with the uniform mode.

Use the Guideline to divide the sides of the photo we will trace later.
Simply drag from the ruler guide line then position in the middle of the face. Later this guideline will help us in determining the line of vertical trace.

Next right click on the image and select Lock Object so that by the time the trace object is not intrusive.

geometric vector tutorials, coreldraw
This is a function of the initial guideline, for creating a facet. Use the Pen tool to start the trace.
See the picture below.

Then early last facet of us create the next facet by remaining attentive to the shape of the patterns that we trace.


geometric vector tutorials, coreldraw
Almost as much as we make Wpap, use a straight line and try to do there is a curve in it.
And the results we get are as follows.

geometric vector tutorials, coreldraw
For the mouth we get results like this.

geometric vector tutorials, coreldraw
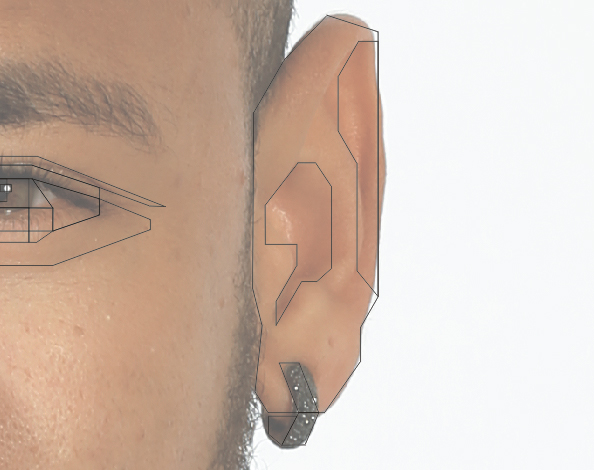
Ear piece we make is simple like the image below.

geometric vector tutorials, coreldraw
And the beard we get results like this.

geometric vector tutorials, coreldraw
Continue to create a facet with techniques such as above up to the right side of the photo is finished we trace. And the result after we separate with a picture then it will look seperrti the picture below.
 geometric vector tutorials, coreldraw

geometric vector tutorials, coreldraw

geometric vector tutorials, coreldraw
Select all the objects, and then remove the outline object with a right click on the color of X.

geometric vector tutorials, coreldraw

geometric vector tutorials, coreldraw
And for other objects of yan there on the left, change the color of the object to colour the colours brighter than before. In this case we make a bright light coming from the left side of the picture while the dark is on the right.

geometric vector tutorials, coreldraw

geometric vector tutorials, coreldraw
After we changed the color on the left with the lighter color, then this is the result we get to sementra time.

geometric vector tutorials, coreldraw

geometric vector tutorials, coreldraw
In addition to the hair, we can add the box – a small box on the beard like the picture below.

geometric vector tutorials, coreldraw
After that also add the appropriate background for the geometric vector portrait.
Here is a geometric vector we have made.
create geometric coreldraw, geometric vector portrait
So the tutorial create a Geometric vector in Coreldraw. Hopefully the tutoria
Coreldraw tutorials at this time, we went back to using the photo ball players. Maybe because I am a fan of this sport, so a lot of tutorials given by design now uses photos of ball players. Geometric vector tutorial and for this I am using photo Xavi Jr. with the uniform.
FOR EXCAMPLE


The following is the final result from geometric vector.

SOFTWARE : Corel Draw X7
TIME : 30 Minute
Here is a step by step we have to do.
Step 1
Open the photos which we will make geometric portrait in CorelDraw. Use photos with position strapping straight like a photo. Since we will use parts of the adjacent sides are then to the reverse side will be in duplicate and use the function mirror horizontally. As a tutorial to make the skull before.As the photos will we wear on this occasion. A photo of one of the stars of the Past i.e. Neymar Jr.
Open the photo, and then turn on the tool and transpancy applied on this photo. Use the transparency tool with the uniform mode.

Use the Guideline to divide the sides of the photo we will trace later.
Simply drag from the ruler guide line then position in the middle of the face. Later this guideline will help us in determining the line of vertical trace.

Next right click on the image and select Lock Object so that by the time the trace object is not intrusive.

geometric vector tutorials, coreldraw
Step 2
At this stage we start tracing following form or pattern of the face in the photo. In the making of this geometric construct facets for neatly and take into account the position of the opposite if it has been in duplicate and in the mirror.This is a function of the initial guideline, for creating a facet. Use the Pen tool to start the trace.
See the picture below.

geometric vector tutorials, coreldraw
Then early last facet of us create the next facet by remaining attentive to the shape of the patterns that we trace.

geometric vector tutorials, coreldraw
To finally be like the picture below.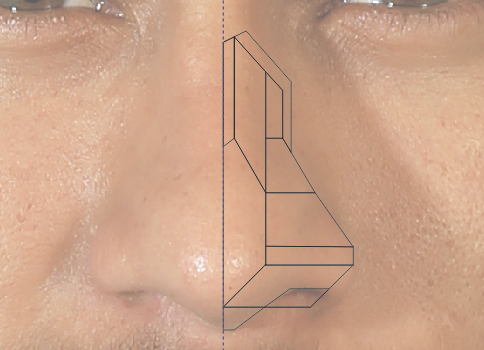
geometric vector tutorials, coreldraw
Almost as much as we make Wpap, use a straight line and try to do there is a curve in it.
Step 3
In this step we started to make facets for part of the Brazilian Player's eyes.And the results we get are as follows.

geometric vector tutorials, coreldraw
For the mouth we get results like this.

geometric vector tutorials, coreldraw
Ear piece we make is simple like the image below.
geometric vector tutorials, coreldraw
And the beard we get results like this.

geometric vector tutorials, coreldraw
Continue to create a facet with techniques such as above up to the right side of the photo is finished we trace. And the result after we separate with a picture then it will look seperrti the picture below.

Step 4
At this stage we started coloring objects – objects that we have made. For coloring, it is advisable to choose soft colors. Staining and results that we get are as follows.
geometric vector tutorials, coreldraw
Step 5
Select all the objects, and then duplicate the object and object to duplicate results, we give a horizontal mirror function. After that we adjust his position with the object before.
geometric vector tutorials, coreldraw
Select all the objects, and then remove the outline object with a right click on the color of X.

geometric vector tutorials, coreldraw
Step 6
Specific to the object of our hair left and right objects merge into one. Select both objects and give the function of the weld.
geometric vector tutorials, coreldraw
And for other objects of yan there on the left, change the color of the object to colour the colours brighter than before. In this case we make a bright light coming from the left side of the picture while the dark is on the right.

geometric vector tutorials, coreldraw

geometric vector tutorials, coreldraw
After we changed the color on the left with the lighter color, then this is the result we get to sementra time.

geometric vector tutorials, coreldraw
Step 7
To beautify the look of geometric we so as not stiffly. We add some additional objects and we can also use the trim function to create hair.
geometric vector tutorials, coreldraw
In addition to the hair, we can add the box – a small box on the beard like the picture below.

geometric vector tutorials, coreldraw
After that also add the appropriate background for the geometric vector portrait.
Final
The congratulations.Here is a geometric vector we have made.

create geometric coreldraw, geometric vector portrait
So the tutorial create a Geometric vector in Coreldraw. Hopefully the tutoria
0 Response to "Best Design How to Create a Geometric, WPAP Vector Portrait in CorelDraw"
Post a Comment